Photo Vignette Effect in Photoshop

Share Vignetting in photography sometimes is the undesired effect caused by lens limitations. And sometimes, it is intentionally created by photographer to draw viewers' focus to the center of the frame where the subject is. A photo will be bright and clear in the center, while the edges kind of darker. Don't worry though, if you don't have that super-expensive camera, because it's pretty easy to duplicate this effect in Photoshop. Probably will only take less than 60 seconds to achieve this classic vignette effect. Take a look at the sample images below. See how the subject is nicely framed by the dark edges.

Before..


After..


1. Open your image.

2. Go to Filter > Distort > Lens Correction.
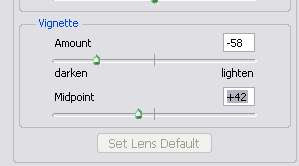


3. A new window will open. Look for the Vignette part of the settings. You will see two sliders, AMOUNT and MIDPOINT. Sliding the AMOUNT slider to the left will make the edge darker. Sliding the AMOUNT slider to the right will make the corners brighter and excellent for creating light vignetting on dark image. You can use the MIDPOINT slider to adjust the depth of the effect to your desire.

And we're done. See how simple it is. And below are some additional images I created using this effect.


0 Comments:

Post a Comment


About

Site Info

I share information,tutorial for those who want to learn. This blog is new and open to all, if you also want to become part of this blog and share your knowledge. I welcome you, just contact me using facebook or email. I hope everyone will learn something new from my blog. Sharing is Caring !!!

Tutorialz Geek - By Zaid Shakil Copyright © 2010