Just how popping the reds will be? Take a look at some examples below..
1. Open you image in Photoshop. Preferably, use the image with some reds on it. Otherwise, you're defying the whole purpose of this tutorial.
2. Duplicate your image. Set the layer mode to 'Screen'. And the opacity setting will depend on what type of picture you have. If it's a slightly dark picture, use high opacity setting. Or add another Screen layer if necessary. Just pick a number now. Later, when you're done with all the steps, we can still adjust the opacity for the best result. Unlike life decision, we always have a rewind button here.
3. Next, duplicate the image one more time. Set the layer mode to 'Soft Light'. We're trying to make the overall color pops. Set the opacity around 40 - 50%...or whatever lucky number you like.
4. Now, go to Layer > New Adjustment Layer > Selective Color.
Use the settings below for Reds.
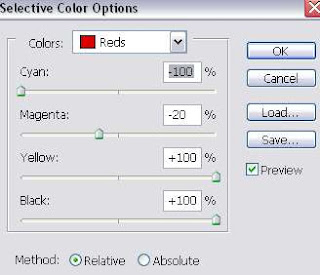
And use the settings below for Neutrals. Click OK.
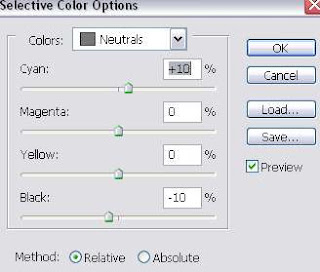
5. Next, go to Layer > New Fill Layer > Solid Color. Set the color value as shown below.
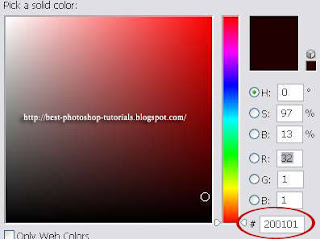
Set this Color Fill layer mode to Exclusion at 100% opacity.
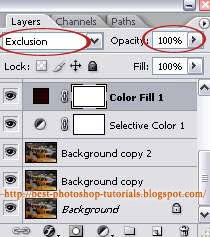
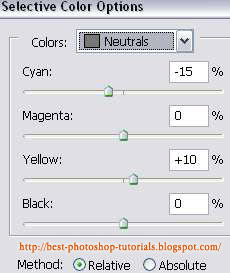
6. Again, go to Layer > New Adjustment Layer > Selective Color. A little bit more work to do here. Set the settings as follows:
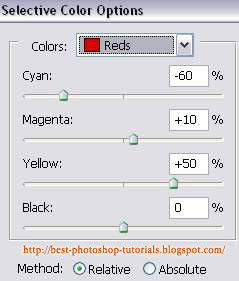
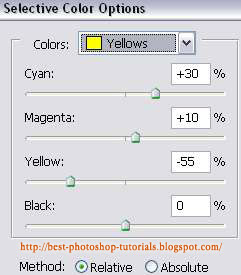
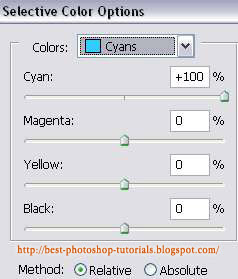
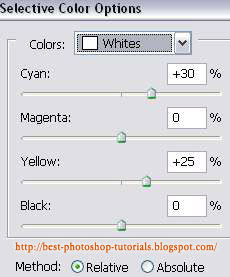
7. Next, go to Layer > New Fill Layer > Solid Color. Set the color value as shown below.
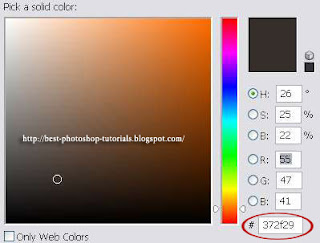
Set this Color Fill layer mode to Lighten at 70% opacity.
8. Again, go to Layer > New Fill Layer > Solid Color. Set the color value as shown below.
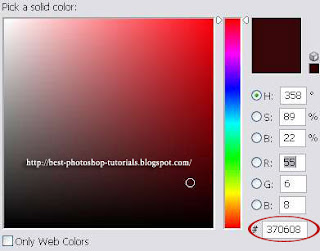
Set this Color Fill layer mode to Exclusion at 80% opacity.
9. I promise you, this will be last Color Fill layer you need to do. Go to Layer > New Fill Layer > Solid Color. Set the color value as shown below.
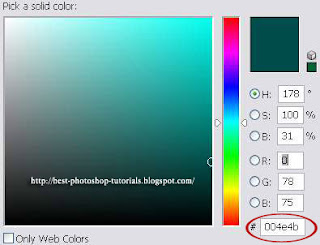
Set this Color Fill layer mode to Exclusion at 10% opacity.
10. Next, go to Layer > New Adjustment Layer > Curves. We're just gonna do the S-curve for the Reds and the inverted S-curve for the Blues. See images below:
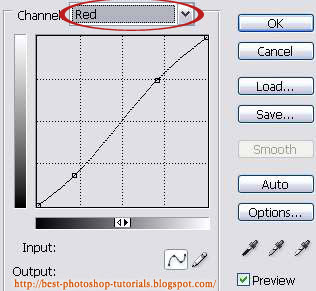
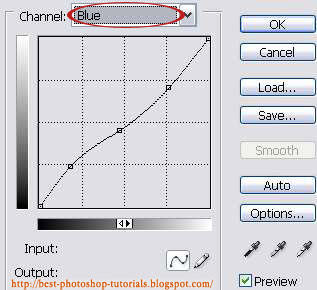
We're actually done here. But if your image doesn't look so good, you can go back to some of the layers and adjust the opacity, until you got something good. If still no improvement, then maybe today's not your lucky day..try again tomorrow =)
Unlike your boss, it's always our goal here to make your life easier. Don't feel like reading the whole tutorial? Maybe just download the PSD file below and start working from there.
DOWNLOAD RedPOPPING PSD


0 Comments:
Post a Comment